Knowing how to rig a fishing kayak is the difference between a frustrating day on the water and a dialed-in machine that puts fish in the cooler. A stock kayak straight off the showroom floor is a blank canvas. It floats, it paddles, and that’s about it. The rigging is what transforms it into a legitimate fishing platform — one where every tool, rod, and piece of tackle has a purpose-built home within arm’s reach.
Whether you just picked up your first sit-on-top or you’re looking to optimize a pedal drive fishing kayak you’ve had for seasons, this guide walks through the entire rigging process from essential basics to advanced setups. We’ll cover the gear categories that matter, the installation order that makes sense, and the mistakes that cost anglers time and money.
For a broader look at the sport, check out our kayak fishing hub where we cover gear reviews, technique guides, and destination breakdowns.
Why Rigging Order Matters
Before you start drilling holes and running wires, understand this: rigging order determines how cleanly your kayak comes together. Installing a fish finder before you’ve mounted your crate system can force awkward cable routing. Bolting down rod holders before figuring out your seating position means they end up in the wrong spot.
The sequence outlined in this guide follows a logical build order — starting with the gear you interact with most and building outward from there. Each section assumes the previous one is complete.
What you’ll need for most installations:
- Marine-grade stainless steel hardware (316 stainless or better)
- Well nuts or rubber-backed rivets for through-hull mounting
- Marine sealant (a tube of Lexel or 3M 4200 is plenty)
- A drill with standard and step bits
- Measuring tape and a pencil
- Blue painter’s tape for marking drill points
Essential Rigging: The Foundation
These are the three systems that every fishing kayak needs before it hits the water. Get these right and everything else is optimization.
Rod Holders
Rod holders are the single most impactful rigging addition you can make. They free up your hands for paddling, netting fish, and managing tackle — and they keep expensive rods secure instead of rolling around the hull.
Flush-mount rod holders are the cleanest option. They sit inside the hull at an angle, typically 15 to 30 degrees off vertical, and accept rods butt-first. Most anglers install two behind the seat for trolling and transport. Installation requires cutting a hole through the hull with a hole saw (typically 1.75 to 2 inches in diameter), seating the holder with marine sealant, and fastening with stainless hardware from below.
Adjustable rod holders mount on tracks or directly to the gunwales. Scotty and RAM are the dominant brands here. These are more versatile since you can change the angle, height, and position — ideal for anglers who switch between techniques. If your kayak has factory-installed accessory tracks (most modern fishing kayaks do), these bolt right in with no drilling required.
Placement tips:
- Behind the seat: two flush-mount holders angled outward at 15 degrees for trolling
- Beside the seat: one or two adjustable holders on the tracks for active rods
- Ahead of the seat: optional holder for a spare rod or a fly rod in a tube
Start with two flush-mount holders behind the seat and one adjustable holder on your dominant side. You can always add more, but most anglers find three to four holders covers every scenario.
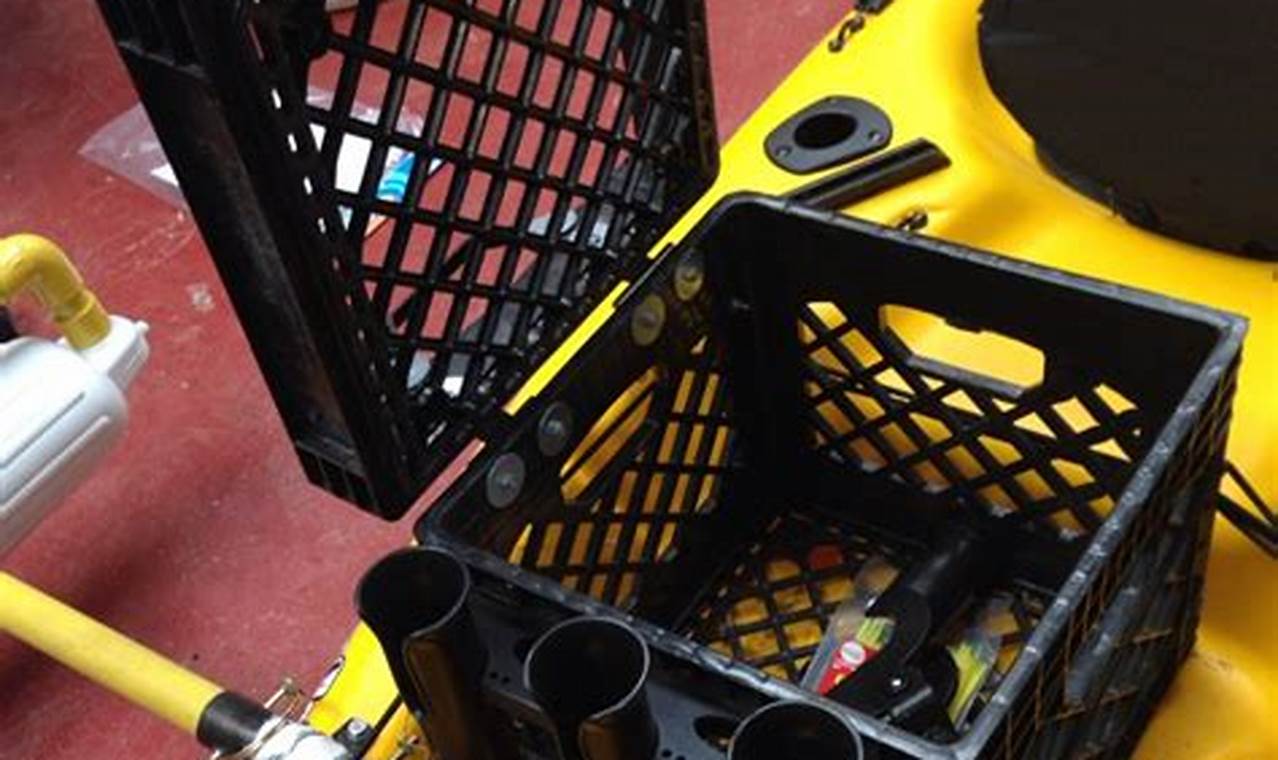
Crate System
A milk crate or purpose-built kayak crate mounted behind the seat is the organizational backbone of your rigging. It serves as rod holder mount, tackle storage, and gear platform all in one.
Building a DIY crate system:
- Start with a standard 13x13-inch plastic milk crate or a commercial kayak crate (BlackPak Pro is the gold standard here).
- Attach it to the rear tankwell using bungee cords looped through existing scupper holes or dedicated pad eyes. Avoid permanent mounting — you want to be able to remove it for transport.
- Add vertical rod tubes to the outside walls using PVC pipe (1.5-inch diameter, 12 to 14 inches tall) secured with zip ties or bolts.
- Install a cutting board or flat lid on top for a rigging surface.
- Inside, use small Plano boxes or bags to organize terminal tackle, leaders, and tools.
The crate sits in the natural cockpit behind most kayak seats, keeping weight centered and everything accessible with a simple reach-back. Four to six vertical rod tubes on the crate give you transport holders for your full rod arsenal without eating up deck space.
Anchor Trolley
An anchor trolley lets you reposition your anchor point from bow to stern without leaving your seat. This is critical for controlling your kayak’s angle to wind and current — which directly determines how effectively you can fish a specific spot.
Components:
- Two pulleys (bow and stern)
- A length of paracord or small-diameter rope run through both pulleys
- A carabiner or ring that rides on the line
- Pad eyes or anchor points at each end
Installation steps:
- Mark your mounting points. The bow pulley goes roughly 12 inches back from the bow on the gunwale. The stern pulley goes 12 inches forward of the stern on the same side. Always install the trolley on the side you’ll be casting from most — typically your dominant hand side.
- Drill pilot holes and mount the pulleys using well nuts and marine sealant. Each pulley gets two mounting points.
- Run the paracord through both pulleys in a continuous loop, tying it off so the line is taut but the ring slides freely.
- Attach a carabiner to the trolley ring. Your anchor line clips to this carabiner.
To use it, clip your anchor line to the carabiner and pull the trolley cord to slide the anchor point forward or backward. Positioning the anchor point near the bow turns you into the wind. Sliding it toward the stern lets the wind push your bow downwind. A midship anchor point holds you broadside to current — perfect for drifting a flat.
Electronics Setup
Modern fish finders have transformed kayak fishing. A good unit gives you bottom contour, structure, baitfish presence, and water temperature — information that cuts hours off the learning curve on unfamiliar water.
Fish Finder Mounting
The mounting location needs to balance visibility, accessibility, and protection from paddle strikes or wave splash.
Best mounting positions:
- Ahead of the cockpit on a ram mount or swing arm: This is the most common setup. A RAM ball mount on the kayak’s center console area or a dedicated electronics mount positions the screen at a comfortable viewing angle. Swing arms let you push the unit aside when landing fish.
- On the crate behind you: Less common, but some anglers prefer this for a cleaner cockpit. You’ll be turning your head to check it, so this works better on pedal kayaks where you’re not actively paddling.
Use a RAM 1-inch ball system for most units under 9 inches. The ball-and-socket design absorbs vibration and allows infinite angle adjustment. Secure the base with stainless bolts through the hull (sealed with marine sealant) or onto existing accessory tracks.
Transducer Placement
The transducer is the underwater sensor that sends and receives sonar signals. Placement determines the quality of your sonar image, so this step deserves careful attention.
Scupper hole mount (recommended for most kayaks): Many sit-on-top kayaks have a scupper hole near the center or stern that aligns perfectly with a through-hull or scupper-mounted transducer. Kits from companies like YakAttack and Scotty provide a plug that holds the transducer inside the scupper, shooting the sonar signal straight down through the water that naturally fills the hole. No external drag, no exposed hardware.
Glue-in-hull mount: For kayaks with flat hull sections, you can epoxy the transducer directly to the inside of the hull. The sonar signal passes through the plastic. This eliminates all external protrusions but may reduce signal quality by 10 to 20 percent depending on hull thickness and material. Use a two-part marine epoxy and ensure zero air bubbles between the transducer face and the hull.
Transom-style mount on a rudder area: Some anglers mount the transducer on a small arm near the stern, similar to a boat transom mount. This works but exposes the transducer to damage from beaching and shallow water contact.
Whichever method you choose, keep the transducer as close to the waterline as possible and away from turbulence caused by paddle strokes or pedal drive wash. A clean water flow across the transducer face produces the sharpest sonar image.
Power Management
Fish finders need 12-volt power. In a kayak, that means a battery — and managing that battery properly is the difference between a full day of electronics use and a dead screen by noon.
Battery options:
- Sealed lead-acid (SLA): Cheapest option. A 7Ah to 9Ah SLA battery will run most 5 to 7-inch fish finders for 8 to 12 hours. Heavy (around 5 to 6 pounds) and requires upright orientation.
- Lithium iron phosphate (LiFePO4): Lighter (2 to 3 pounds for equivalent capacity), longer lifespan (2,000+ charge cycles vs. 300 to 500 for SLA), and can be mounted in any orientation. Dakota Lithium and NorCal are popular choices. Higher upfront cost but dramatically better value over time.
Wiring best practices:
- Use marine-grade tinned copper wire (16 AWG minimum for runs under 6 feet).
- Install an inline fuse within 6 inches of the positive battery terminal. Match the fuse rating to your fish finder’s draw — typically 3 to 5 amps.
- Route wires through split loom tubing to prevent chafing against the hull.
- Use waterproof connectors at every junction point. Heat-shrink butt connectors with adhesive lining are the minimum standard. SAE or Anderson Powerpole connectors make disconnecting for transport easy.
- Secure all wiring with adhesive-backed cable tie mounts so nothing rattles or shifts.
Store the battery in a small dry box (Plano 1612 or similar) mounted inside the hull or in the crate. Velcro straps keep the box from shifting during transport. Always disconnect the battery when not in use to prevent parasitic drain.
Storage and Organization
A cluttered kayak is a slow kayak. Every piece of gear should have a designated spot that you can access without standing, leaning dangerously, or rummaging through a pile.
Tackle Management
Ditch the full-size tackle box. It won’t fit, and even if it does, it’s a liability in a kayak. Instead, build a modular system.
- 3600-size Plano trays are the kayak fishing standard. They fit perfectly inside most crate systems and tankwells. Carry three to five trays organized by technique — one for soft plastics, one for hard baits, one for terminal tackle.
- Soft-sided tackle bags designed for kayak fishing (Plano Weekend Series, Flambeau Ritual) hold multiple 3600 trays in a water-resistant shell with exterior pockets for pliers and leaders.
- A small magnetic tool holder mounted on the crate or console keeps forceps, line cutters, and hook removers from disappearing into the hull.
Deck Organization
Use bungee cord and pad eyes to create gear-specific zones on your deck:
- Forward tankwell: Landing net, stringer, PFD storage
- Center console area: Active tackle tray, fish finder, phone in waterproof case
- Rear tankwell: Crate system with rods, backup tackle, dry bag with personal items
Leash everything that matters. A retractable tool lanyard for pliers, a paddle leash, and a rod leash for your primary rod are non-negotiable. Gear that goes overboard in a kayak is gone. There’s no walking to the back of the boat to pick it up.
Dry Storage
Most fishing kayaks have at least one sealed bow hatch. Use this for items that absolutely cannot get wet:
- Phone and wallet in a waterproof case (even inside the hatch)
- Spare clothes in a dry bag
- First aid kit
- Car keys clipped to an interior pad eye
Avoid overloading the bow hatch — it affects trim and paddling efficiency. Keep heavy items in the center of the kayak whenever possible.
Safety Gear
Rigging for fishing means nothing if you’re not rigged for safety first. These items are non-negotiable.
PFD (Personal Flotation Device)
Wear it. Every time. A kayak-specific PFD designed for paddling (high-back design that clears the seat) is essential. Look for models with front pockets for tackle storage — some anglers use their PFD pockets as their primary terminal tackle storage for quick access. Brands like NRS, Stohlquist, and Astral make fishing-specific models with rod holder loops, plier sheaths, and hydration compatibility.
Visibility and Signaling
- A whistle attached to your PFD. Required by law in most states.
- A flag or visibility pole for low-light conditions or areas with boat traffic. A safety flag on a 4-foot pole mounted to the crate is visible from a distance that a low-profile kayak is not.
- A waterproof VHF radio or phone in a waterproof case for communication on larger bodies of water.
Self-Rescue Gear
- Paddle leash: Already mentioned, but it’s a safety item as much as a convenience item.
- Bilge pump or large sponge: For removing water from the cockpit after waves or a partial swamp.
- Anchor with a quick-release mechanism: Being able to instantly disconnect from your anchor in an emergency (sudden wind shift, approaching vessel) can prevent a capsize. Use a float on your anchor line so you can retrieve it after releasing.
Advanced Rigging
Once your essential systems are dialed in, these additions take your setup from functional to purpose-built.
Lighting
Navigation lights are legally required for kayaks operating between sunset and sunrise in most jurisdictions. Beyond compliance, they keep you visible and alive.
- A white 360-degree light mounted on a pole behind the seat satisfies most inland waterway requirements. Yak-Power and RAILBLAZA make kayak-specific LED options that run on the same 12V battery as your fish finder.
- Green and red bow lights are required for coastal or high-traffic waterways. LED strip lights inside the bow scupper holes are a clean installation method.
- UV or blue LED strips inside the cockpit illuminate your tackle area without destroying your night vision. Mount them under the gunwale lip using adhesive-backed LED strips connected to a small switch.
Camera Mounts
Documenting your catches and sharing your kayak fishing experience is part of the fun. A clean camera mount setup stays out of the way until you need it.
- A RAM mount with a GoPro adapter on the bow gives you the classic forward-facing angle.
- A flexible arm mount on the crate lets you capture the cockpit and your catch.
- Use a 360-degree camera (Insta360 or similar) on a short pole for immersive footage that you can reframe in post.
Mount all camera bases permanently but keep the cameras themselves removable. You don’t want an expensive action camera taking a saltwater bath because it was left mounted during a rough crossing.
Livewells and Bait Tanks
Live bait anglers and tournament kayak fishermen benefit from a small livewell system. Purpose-built kayak livewells are essentially insulated bags or small tanks with a battery-operated aerator pump.
- Bag-style livewells (Engel or similar) sit in the rear tankwell and use a small 12V pump to circulate and oxygenate water. They fold flat for storage when not in use.
- DIY livewells can be built from a small cooler with a bilge pump and aerator fitted through the lid. Use a separate small battery or wire into your main 12V system through a switch.
- Bait buckets with clip-on aerators are the simplest option for anglers who just need to keep a few dozen shiners or shrimp alive. They mount inside the crate or clip to the gunwale.
Power Expansion
As you add electronics — fish finder, lights, aerator, USB charger for your phone — power management becomes more complex. Consider a power distribution system.
- A Yak-Power kit provides a central bus with switched circuits for each accessory. It’s the cleanest wiring solution and eliminates the rat’s nest of individual battery connections.
- Alternatively, a simple terminal block inside a dry box with individual fused circuits achieves the same function at lower cost. Run a positive and negative bus bar, fuse each circuit individually, and use SAE or Anderson connectors for each accessory.
- If running multiple electronics, upgrade to a 12Ah or 18Ah LiFePO4 battery to ensure full-day capacity with margin.
Common Mistakes to Avoid
After seeing hundreds of kayak rigging setups — and making plenty of our own mistakes — these are the errors that cost the most time and money.
Drilling without measuring twice. Every hole in your hull is permanent and a potential leak point. Measure, mark with tape, double-check against your seating position, and then drill. Seal every hole with marine sealant, no exceptions.
Overloading the kayak. Every piece of rigging adds weight. A fish finder, battery, crate full of tackle, anchor, and safety gear can easily add 30 to 50 pounds. Know your kayak’s rated capacity and subtract your body weight. The remaining number is your gear budget. Exceeding it makes the kayak sluggish, unstable, and prone to taking on water over the gunwales.
Ignoring weight distribution. Even if you’re under the weight limit, concentrating gear in one area creates trim problems. Heavy items like batteries and anchors should be as close to center as possible. A bow-heavy kayak tracks poorly. A stern-heavy kayak is sluggish to turn.
Using non-marine hardware. Standard zinc-plated steel bolts will rust within weeks of saltwater exposure and within a season in freshwater. Use 316 stainless steel for everything. It costs more and is worth every penny.
Running wires externally. Exposed wires snag on everything — paddle shafts, fishing line, your PFD. Route all wiring internally through the hull whenever possible. Use split loom and adhesive cable tie mounts to keep runs clean and protected.
Skipping the sealant. Marine sealant on every through-hull fitting is not optional. Water intrusion through unsealed bolt holes slowly fills the hull, adding weight and eventually compromising flotation. A bead of Lexel or 3M 4200 around every bolt and well nut takes seconds and prevents real problems.
Rigging for someone else’s fishing. Your kayak should be set up for how you actually fish, not how a YouTube angler fishes. If you throw soft plastics 90 percent of the time, you don’t need six rod holders and a livewell. Start with the essentials, fish several trips, then add gear to solve problems you actually encounter.
Frequently Asked Questions
How much does it cost to fully rig a fishing kayak?
A basic rigging setup — rod holders, a crate system, an anchor trolley, and a fish finder with battery — typically runs between $300 and $600 depending on brand choices. A fully loaded setup with lithium battery, navigation lights, camera mounts, and power distribution can reach $800 to $1,200. Spread the investment across several paychecks and prioritize rod holders and a crate first, since those make the biggest immediate difference.
Can I rig a sit-inside kayak for fishing?
Yes, but with limitations. Sit-inside kayaks have less accessible deck space and fewer factory mounting points. Flush-mount rod holders work well since they install into the deck behind the cockpit. Electronics mounting is usually limited to the cockpit rim or a cross-bar mount. You won’t have a rear tankwell for a crate system, so storage is more constrained. For dedicated kayak fishing, a sit-on-top design is significantly easier to rig.
Do I need to seal every hole I drill in the kayak?
Absolutely. Every through-hull penetration is a potential water intrusion point. Use marine sealant — Lexel, 3M 4200, or similar — around every bolt, well nut, and rivet. Apply sealant to the hardware before inserting it and wipe away the excess after tightening. This creates a watertight compression seal that lasts for years.
What size fish finder is best for a kayak?
A 5 to 7-inch display hits the sweet spot for most kayak anglers. It’s large enough to read at a glance in bright sunlight without dominating your limited deck space. Units in this range, like the Garmin Striker Vivid 7sv, offer CHIRP sonar and GPS mapping — which is everything most kayak anglers need. Nine-inch and larger displays are viable on wider kayaks with dedicated console space, but they draw more power and are harder to position cleanly.
How do I prevent my fish finder from getting wet?
Mount the unit on a swing arm or removable mount so you can stow it inside a hatch during rough crossings or transport. Use a waterproof connector between the power cable and the battery so you can quickly disconnect. Most modern fish finders are rated IPX7 (submersible to 1 meter for 30 minutes), so splashing is not a concern. The bigger risk is prolonged UV exposure — use a screen cover when the unit is not in use.
Should I install a rudder system as part of my rigging?
A rudder helps with tracking in wind and current, but it’s not a rigging essential for most anglers. If your kayak came without a rudder and you’re frequently fishing open water, coastal areas, or large lakes with wind exposure, a retrofit rudder kit is a worthwhile addition. It’s a more involved installation than most rigging projects — requiring stern-mounted hardware, foot-operated cables, and a deploying mechanism — so plan for a dedicated afternoon.
Can I rig a kayak without drilling any holes?
Mostly, yes. Track-mounted accessories, bungee-attached crates, scupper-mounted transducers, and clamp-on rod holders can get you a functional fishing setup with zero drilling. The trade-off is that track and clamp systems are bulkier, slightly less secure, and limit your mounting options compared to through-hull installations. Many anglers start drill-free and add permanent mounts once they’ve confirmed their preferred gear positions over several trips.