Whitetail deer hunting is the backbone of American hunting culture, and for good reason. Whitetails live in every state in the Lower 48, seasons are accessible, the meat is exceptional, and the pursuit itself ranges from simple and meditative to deeply strategic depending on how far you want to take it. Whether you grew up around hunters and are finally ready to try it yourself or you are coming in with zero background, this is a pursuit that rewards preparation, patience, and a genuine willingness to learn.
We have been chasing whitetails across hardwoods, ag fields, and public timber for years, and we still learn something new every season. That is part of what makes deer hunting compelling — it is never solved. This guide covers everything a first-time whitetail hunter needs to go from no experience to a realistic chance at filling a tag. We will walk through licensing, weapon selection, gear, deer behavior, scouting, hunting strategies, shot placement, and what to do after the shot. For a broader look at how we test and evaluate gear across all categories, visit our methodology page. And for more big-game content as we build it out, check our big-game hunting hub.
Hunter Education and Licensing
Before you set foot in the woods with a weapon, you need to complete two things: a hunter education course and the appropriate licenses and tags for your state. This is non-negotiable, and it is the first thing every responsible hunter does.
Hunter Education
Every state requires first-time hunters to complete an accredited hunter education course. Most states offer both in-person and online options, and some require a combination — an online portion followed by a hands-on field day. The course covers firearm safety, wildlife conservation, hunting ethics, regulations, survival basics, and responsible land use. It typically takes 10 to 12 hours to complete and costs between nothing and $25 depending on the state.
Do not view hunter education as a bureaucratic hurdle. It is genuinely valuable, especially if you did not grow up around firearms or hunting. You will learn things that keep you and everyone around you safe. Many states also offer mentored hunting programs that allow a first-time hunter to go afield with an experienced mentor before completing the full course — this can be an excellent way to get your first taste of the experience while you work through the education requirements.
Licenses, Tags, and Regulations
Once you have your hunter education certificate, you need to purchase the correct licenses and tags for the state where you plan to hunt. At minimum, this usually means a general hunting license and a deer tag. Some states separate tags by weapon type — you may need a specific archery tag, muzzleloader tag, or firearms tag depending on which season you plan to hunt. Others use a lottery or draw system for certain units, particularly in Western states.
Here is what you need to verify before your first season:
- Season dates for each weapon type. Archery seasons typically open earliest (often September or October), followed by muzzleloader and firearms seasons. Dates vary dramatically by state.
- Bag limits and antler restrictions. Some states allow one buck and one doe. Others have earn-a-buck requirements, antler point restrictions, or antlerless-only zones.
- Legal shooting hours. Generally 30 minutes before sunrise to 30 minutes after sunset, but check your state’s exact definition.
- Zone or unit designations. Many states divide the state into management zones with different rules, season lengths, and tag availability.
- Orange requirements. During firearms season, most states require a minimum amount of blaze orange — typically a hat and vest or a solid upper garment visible from all directions.
Your state’s Department of Natural Resources website is the definitive source. Read the current regulations digest completely, not just the summary. Ignorance of a regulation is never an accepted defense, and a violation can result in fines, loss of hunting privileges, and confiscation of equipment.
Choosing a Weapon: Rifle vs. Bow vs. Muzzleloader
One of the first decisions you will make as a new whitetail hunter is which weapon to start with. Each has distinct advantages, and the right choice depends on your experience level, your state’s season structure, and how much time you are willing to invest before your first hunt.
Rifle
A centerfire rifle is the most forgiving and effective starting point for a first-time deer hunter. Modern bolt-action rifles chambered in common deer cartridges are accurate, reliable, and provide ethical kill distances that are far more forgiving of minor errors in range estimation or shooting form than a bow.
The most popular and versatile deer cartridges for beginners include the .308 Winchester, .30-06 Springfield, 6.5 Creedmoor, and .270 Winchester. All four are widely available, produce manageable recoil, and are effective on whitetails at any reasonable hunting distance. For a deeper dive into cartridge selection and ballistics, check our hunting caliber guide — it breaks down the trade-offs across the most common options.
Pair your rifle with a quality scope. A 3-9x40 variable optic is the classic deer hunting scope for a reason — it provides enough magnification to place precise shots at 200 yards while maintaining a wide field of view at low power for close encounters in thick timber. Budget between $150 and $300 for a scope that will hold zero and deliver a clear image in low light. Cheap glass fails you exactly when it matters most: in the last 20 minutes of legal shooting light when most mature deer move.
Bow
Bowhunting is deeply rewarding but demands significantly more skill and practice than rifle hunting. Effective bow range on whitetails is typically 20 to 40 yards, which means you need to get much closer to the animal — and that requires superior woodsmanship, scent control, and patience. The margin for error on shot placement is also narrower.
If you are brand new to hunting, we generally recommend starting with a rifle season to build foundational skills — reading deer sign, understanding movement patterns, sitting still for hours, and managing the emotional intensity of having a live deer in front of you. Many hunters transition to archery after a season or two of firearms hunting and find the added challenge addictive. That said, if you are already an experienced archer or simply drawn to the bow from the start, archery seasons are longer, less crowded, and often coincide with the rut — the most exciting time to be in a tree stand.
Muzzleloader
Muzzleloader seasons offer an additional opportunity to hunt, usually falling between archery and firearms seasons or after the general firearms season. Modern inline muzzleloaders are reasonably accurate to 150 yards and give you access to a separate tag in many states, effectively extending your season. The loading process is slower and more involved than a cartridge rifle, and you typically get one shot, which sharpens your focus on making that shot count.
Muzzleloader hunting is a strong second-season option once you have some experience, but it is not the most practical starting point for a complete beginner.
Essential Gear List (Budget-Conscious)
You do not need to spend thousands of dollars to hunt whitetails effectively. The following list covers what you actually need for your first season, prioritized by importance.
Must-Have Gear
- Weapon and ammunition. Your rifle, scope, and a box of quality hunting ammunition. Sight in your rifle at the range before the season — this is critical, not optional.
- Hunting license and tags. Physically on your person or accessible on your phone, depending on your state’s rules.
- Blaze orange. A hat and vest at minimum during firearms season. Some states require more.
- Binoculars. Even in eastern whitetail timber, binoculars let you identify deer, check for antler restrictions, and scan terrain without moving your whole body. A quality budget pair makes a bigger difference than most beginners expect. We tested and ranked the best affordable options in our best budget hunting binoculars roundup — the Vortex Diamondback HD consistently tops that list for new hunters.
- Knife. A sharp, fixed-blade knife with a 3- to 4-inch blade for field dressing. Nothing fancy. Keep it sharp.
- Clothing layers. Scent-free base layer, insulating mid-layer, and a quiet outer layer appropriate for the temperature. Sitting motionless in a tree stand in November is dramatically colder than walking to your stand. Dress warmer than you think you need to.
- Boots. Insulated, waterproof hunting boots appropriate for your terrain and temperature. Cold feet end more hunts than anything else. Rubber boots also help with scent control on your walk in.
- Safety harness. If you are hunting from an elevated stand, a full-body safety harness is mandatory. Falls from tree stands are the leading cause of serious injury and death in deer hunting. Wear it from the moment you leave the ground until the moment you are back down. No exceptions.
- Headlamp. A red- or green-light capable headlamp for walking to and from your stand in the dark.
- Pack. A daypack to carry your gear, water, food, license, and any harvested meat if you are hunting away from a vehicle.
Nice-to-Have Additions
- Rangefinder. Removes guesswork on shot distance. Especially valuable for bowhunters but useful for rifle hunters too.
- Grunt call and rattling antlers. Effective during the rut. Inexpensive and easy to learn the basics.
- Scent elimination spray. Helps manage human odor on clothing and gear.
- Game bags. Breathable mesh bags to protect quartered meat from insects and debris during warm early-season hunts.
- Drag sled or game cart. Getting a 150-pound deer out of the woods is harder than you think. A cheap sled or cart saves your back.
Understanding Whitetail Behavior
Killing a whitetail consistently requires understanding how and why they move. Whitetails are creatures of pattern, and those patterns shift predictably based on the time of year, food availability, and breeding activity. Knowing what drives their movement at any given point in the season lets you position yourself in the right place at the right time.
Feeding Patterns
Whitetails are crepuscular feeders — most active at dawn and dusk. During early season, deer establish consistent feeding routines. They bed in thick cover during the day, then move to food sources in the late afternoon. In agricultural areas, this means soybean fields, corn, and alfalfa. In timber-heavy areas, white oak acorns are the premier early-season food source — a white oak dropping acorns will pull deer from a wide area. As fall progresses and crops are harvested, deer shift to remaining food sources like standing corn, food plots, waste grain, and browse.
Understanding what deer are eating right now is one of the most reliable ways to pattern them. Find the food, and you will find the deer.
Bedding Areas
Deer bed in areas that provide security cover and a wind advantage. Thick brush, overgrown clearcuts, cedar thickets, CRP grass, and ridgeline points are all common bedding areas. A bedded deer positions itself so that the prevailing wind carries scent from behind and below while its eyes cover the terrain downwind and ahead.
As a beginner, you should avoid hunting directly in or immediately adjacent to bedding areas. Bumping deer from their beds educates them rapidly, and pressured deer become nocturnal faster than almost anything else you can do wrong. Instead, hunt the travel routes between bedding and feeding areas, positioning yourself where deer pass through during legal shooting hours.
Travel Corridors
Deer travel between bedding and feeding areas using the path of least resistance that provides the most cover. These corridors are visible on the landscape once you know what to look for:
- Fence crossings. A low spot in a fence where deer cross repeatedly will have visible hair, tracks, and worn ground.
- Saddles and benches. Terrain features on ridgelines where deer cross from one drainage to another. A saddle between two high points is a natural funnel.
- Creek crossings. Deer cross streams and creeks at predictable shallow points.
- Edges. Where two habitat types meet — timber and field, thick cover and open hardwoods, CRP and crop field — deer travel these edges because they provide both food access and escape cover.
- Ditches and draws. Linear features that provide cover and a natural travel lane.
The Rut
The whitetail rut — the annual breeding period — is the single most important event on a deer hunter’s calendar. In most of the United States, peak breeding occurs between late October and mid-November, though timing varies by latitude and local herd dynamics.
During the rut, mature bucks abandon their normal patterns and travel widely in search of receptive does. Bucks that you would never see during daylight hours suddenly appear in the open at midday. They move more, eat less, and make decisions driven by breeding impulse rather than survival instinct. The rut is when the odds shift most dramatically in a hunter’s favor, especially for mature bucks.
Key rut phases to understand:
- Pre-rut (2-3 weeks before peak breeding). Bucks increase scrape and rub activity, checking does for receptiveness. They are still somewhat patternable but expanding their range. Hunt travel corridors and scrape lines.
- Seeking phase. Bucks actively cruise for the first estrous does. They cover ground aggressively. Hunt funnels, pinch points, and doe feeding areas.
- Peak rut. Bucks lock down with individual does for 24 to 48 hours of breeding, then immediately seek another. Daytime activity can be sporadic but intense. All-day sits are worth the effort during peak rut.
- Post-rut. Bucks are exhausted and return to food sources to recover body condition. A brief second rut occurs approximately 28 days after the first peak when unbred does cycle again.
Scouting: Finding Deer Before the Season
Effective scouting is the bridge between understanding deer behavior in theory and applying it to a specific piece of ground. The goal of scouting is to identify where deer are bedding, feeding, and traveling so you can place yourself in the right location on opening day.
Reading Sign
Learn to see what the deer are telling you through the sign they leave behind:
- Tracks. Fresh tracks in soft soil or mud tell you deer are using an area and roughly when. Large, deeply pressed tracks with dew claw impressions suggest a heavy-bodied deer.
- Trails. Well-worn paths through grass, brush, or timber indicate consistent use. Multiple trails converging at a single point — a creek crossing, fence gap, or field edge — are high-value locations.
- Rubs. Bucks rub their antlers on trees to mark territory and shed velvet. Fresh rubs with exposed white wood and bark on the ground tell you a buck is working the area. Larger-diameter trees generally indicate larger bucks.
- Scrapes. Oval patches of bare earth pawed out under an overhanging branch (the licking branch). Scrapes are communication hubs — both bucks and does visit them. A fresh, actively maintained scrape with a moist licking branch is a high-confidence sign of current activity.
- Droppings. Fresh droppings are dark, moist, and often clustered near feeding or bedding areas. Large pellet groups can indicate a bigger-bodied animal.
- Browse. Nipped branch tips on shrubs and saplings at deer height indicate feeding activity.
Trail Cameras
Trail cameras are the most powerful scouting tool available to a modern deer hunter. A camera placed on an active trail, scrape, or food source edge gives you 24/7 surveillance of what is using the area, when they are moving, and in which direction. Even a single budget trail camera running for two weeks before the season will teach you more about the deer on your property than a month of walking the ground.
Place cameras at a height of about 3 feet, angled slightly downward, facing north or south to avoid sun glare triggering false images. Use the time-stamp data to identify movement patterns — if a target buck consistently passes a camera at 5:45 PM, you know exactly when to be in your stand. Set cameras on scrapes, trail intersections, and field edges for the best return on investment.
Mapping and Aerial Imagery
Free tools like Google Earth and onX Hunt allow you to study terrain features, identify likely funnels and travel corridors, and plan access routes before you ever set foot on the property. Look for terrain pinch points — places where a creek, fenceline, ridge, or thick cover narrows deer movement into a concentrated area. Mark these on your map, then verify them on the ground.
Aerial scouting followed by ground-truthing is the most efficient scouting workflow. Identify ten potential stand locations from the map, walk in during late winter or early spring when there is no risk of disturbing deer, and narrow the list to three or four based on what you find on the ground.
Tree Stand vs. Ground Blind Hunting
How you position yourself to intercept deer is a fundamental strategic decision, and both elevated stands and ground-level setups have clear strengths.
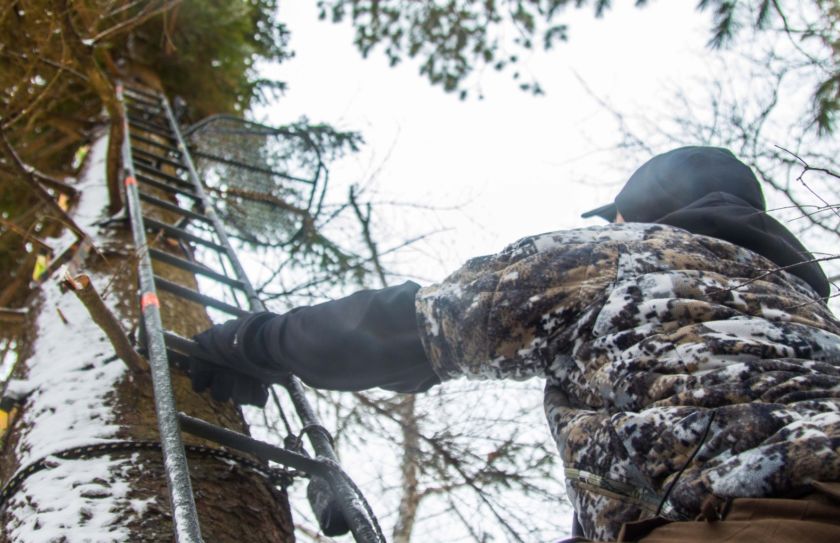
Tree Stands
Hunting from an elevated position — typically 15 to 20 feet up — is the most popular whitetail hunting method in the eastern United States for good reason. Height gets your scent stream above ground-level deer, gives you a broader field of view, and reduces the chance of a deer picking up your movement. The downward shot angle also provides a better window into the vitals.
The three main types of tree stands are:
- Hang-on stands. A fixed platform that you attach to a tree using ratchet straps or chains, accessed via climbing sticks or screw-in steps. These are the most versatile and can be placed on almost any straight tree of adequate diameter. They require the most setup effort but allow precise placement.
- Climbing stands. A two-piece stand that you attach to a tree and climb using a sit-stand motion. Fast to set up and tear down, ideal for mobile hunting on public land. They require a straight, limbless tree of consistent diameter — which limits your options in some timber types.
- Ladder stands. A fixed stand with an attached ladder, typically leaned against and strapped to a tree. The most comfortable and stable option, but heavy, conspicuous, and difficult to relocate.
Safety cannot be overstated. Wear a full-body harness connected to a tether line from the moment you leave the ground. Use a lineman’s climbing belt while installing hang-on stands. Never climb with your weapon — use a haul line to raise and lower it after you are secure in the stand.
Ground Blinds
Ground blinds — either pop-up fabric blinds or natural brush blinds — are an excellent alternative when suitable trees are unavailable, when hunting with youth or hunters with mobility limitations, or when you want total concealment in an open-terrain setup. A pop-up blind placed along a field edge and brushed in with native vegetation can be deadly effective over food sources.
The trade-off is that ground-level setups put your scent at deer nose height, making wind discipline even more critical. Deer can also become wary of a new structure that suddenly appears in their environment, so set ground blinds up at least a week before you plan to hunt from them when possible.
Shot Placement
Ethical shot placement is the single most important skill a hunter develops. A well-placed shot results in a quick, clean kill and minimal suffering. A poorly placed shot results in a wounded animal, a difficult or failed recovery, and an experience that haunts you. There is no shortcut here — you must commit the anatomy to memory and refuse to take shots you are not confident in.
The Vital Zone
The target on a broadside whitetail is the heart and lungs, located in the chest cavity immediately behind the front shoulder. This vital zone is roughly the size of a paper plate on an adult deer. A bullet or arrow through this area results in massive hemorrhage and rapid loss of consciousness.
On a broadside deer, place your crosshairs or pin tight behind the front shoulder, approximately one-third of the way up from the bottom of the chest. This holds true for both rifle and bow. The aiming point shifts slightly depending on the angle:
- Broadside. Ideal shot. Aim directly behind the shoulder crease, one-third up from the brisket.
- Quartering away. The second-best angle. Aim for the opposite shoulder — your projectile enters behind the ribs and angles forward through the vitals.
- Quartering toward. A riskier shot. The shoulder blade can deflect arrows and even light bullets. Most experienced hunters pass on this angle unless the shot window is tight behind the near shoulder. Beginners should let the deer turn.
- Head-on. Do not take this shot. The vital window is extremely narrow, the risk of a jaw or neck wound is high, and a wounded deer facing you will flee directly away from you, making tracking vastly harder.
When to Pass
Learning when not to shoot is as important as learning where to aim. Pass on the shot if:
- The deer is moving at anything more than a slow walk.
- You do not have a clear, unobstructed path to the vitals.
- The range exceeds your effective and practiced distance.
- You are shaking, breathing hard, or emotionally overwhelmed. Take a breath. Calm down. The deer may give you another opportunity. If it does not, that is a story, not a failure.
- You are unsure whether the animal is legal. If you cannot confirm sex or antler requirements with absolute certainty, do not shoot.
After the Shot: Tracking and Field Dressing
The work begins the moment you squeeze the trigger or release the arrow. What you do in the next few minutes and hours determines whether you recover the animal and preserve the meat.
Tracking a Deer After the Shot
After the shot, stay in your stand or blind for at least 30 minutes. This is difficult advice when adrenaline is flooding your system, but it is critical. A fatally hit deer that is left undisturbed will typically bed down within 100 to 200 yards and expire. A deer that is pushed — especially one hit marginally — will run until it drops from exhaustion, potentially a mile or more, and may never be recovered.
Note the exact spot where the deer was standing when you shot, and the direction it ran. Mark the location with a GPS pin or mental landmark. After 30 minutes (longer if you suspect a gut shot — wait 6 to 8 hours minimum), climb down and walk to the impact site.
Look for:
- Blood. Bright red, frothy blood with bubbles indicates a lung shot — an excellent sign. Dark red blood suggests a liver hit — fatal but slower, give it extra time. Green or brown material mixed with blood indicates a gut shot — back out and wait at least 8 hours before tracking.
- Hair. The color and texture of hair at the impact site can indicate where on the body the animal was hit.
- The arrow. If bowhunting, finding your arrow with blood along its entire length indicates a pass-through — the best-case scenario.
Follow the blood trail slowly and methodically. Mark each spot of blood with flagging tape or toilet paper so you can see the trail’s direction if you lose it. Move from blood spot to blood spot, scanning ahead before moving forward. If the blood trail dries up, get on your hands and knees and search in a grid pattern. Check leaves, branches, and grass at the height the wound would be — blood is not always on the ground.
Field Dressing Basics
Field dressing — removing the internal organs — is the first step in preserving the meat. It needs to happen as soon as you recover the deer, especially in warm weather. The process is straightforward but messy.
The short version: place the deer on its back, make a shallow incision from the pelvic bone to the sternum without puncturing the stomach or intestines, cut the diaphragm free from the rib cage, sever the windpipe and esophagus at the top of the chest, and roll the entire viscera out of the body cavity. Prop the cavity open to allow cooling.
We strongly recommend watching a detailed instructional video before your first time. Reading about it is useful, but seeing it done gives you a practical reference that text cannot match. Even better, find an experienced hunter willing to walk you through your first one in person. The hunting community is overwhelmingly generous with this kind of mentorship — ask at your hunter education class or a local sportsmen’s club.
Public Land vs. Private Land
Access is one of the biggest challenges for new hunters who did not grow up with family land to hunt. Understanding your options is essential.
Public Land
Every state maintains public hunting areas — national forests, state game lands, wildlife management areas, and Army Corps of Engineers properties. These are funded by your license dollars and are open to any licensed hunter. Public land is where the majority of first-time hunters start, and plenty of experienced hunters hunt public exclusively.
Public land hunting is harder. Pressure from other hunters pushes deer into nocturnal patterns, the best spots are contested, and you may need to walk farther to find unpressured pockets. But it is absolutely productive if you are willing to put in the work. The hunters who succeed on public land are the ones who scout more, walk farther, and hunt areas that other people are unwilling to access.
Tips for public land success:
- Get off the road. Most public land hunters set up within 400 yards of a parking area. Walk a mile in and you will find dramatically less pressure and more deer sign.
- Scout before the season. Walk the ground in late winter or spring when you will not disturb the fall hunting pattern. Identify funnels, food sources, and bedding cover.
- Be flexible. If another hunter is in your spot, have a backup plan. Do not set up on top of someone else.
- Use mobile setups. Climbing stands and saddle hunting rigs let you adapt to hunting pressure in real time. If deer shift their pattern because of another hunter, you can move with them.
Private Land
If you have access to private land — whether family property, a friend’s farm, or land you have gained permission to hunt — you have a significant advantage. You control the pressure, you can manage the habitat, and you can scout without competing with other hunters.
If you do not have private land access, ask. Knock on doors. Talk to farmers. Many landowners are happy to let respectful hunters on their property, especially if they have crop damage from deer. Be polite, be specific about what you are asking for (which parcel, which season, how many hunters), offer to help with property tasks, and always follow up with a thank-you and a share of the harvest. A handshake relationship with a landowner can provide you with quality hunting access for years.
Some states also offer programs that connect hunters with private landowners who want their land hunted. Check your state DNR website for walk-in access, block management, or similar programs.
Frequently Asked Questions
How much does it cost to start whitetail hunting?
Budget approximately $500 to $800 for a complete first-season setup if you are starting from scratch with a rifle. That includes a used or entry-level bolt-action rifle ($250-$350), a budget scope ($100-$200), ammunition ($30-$50), blaze orange ($20-$30), a knife ($20-$40), and your license and tags ($30-$75 depending on state). You can reduce costs further by borrowing a rifle from a friend or family member for your first season. A safety harness ($50-$80) is mandatory if you plan to hunt from a tree stand. Clothing you likely already own can work for your first season — layer up with dark, quiet fabrics and add dedicated hunting clothing as your budget allows.
What is the best time of year to hunt whitetails?
The rut — typically late October through mid-November in most of the United States — is the single best window for a beginner to encounter deer. Bucks are moving during daylight, covering more ground, and making mistakes they would never make at other times of year. If you can only hunt a few days all season, burn them during peak rut. The opening days of firearms season are also productive in many states simply because deer have not yet been pressured into nocturnal patterns.
Can I hunt whitetails without a tree stand?
Absolutely. Plenty of deer are killed every year from the ground. Still-hunting — moving slowly and quietly through the woods, taking a few steps and stopping to glass — is one of the oldest and most effective methods. Ground blinds work well on field edges and food plots. Simply sitting against a wide tree in full camo along a known travel corridor can be deadly effective if the wind is right. Elevated stands give you advantages, but they are not required.
How do I find a mentor or hunting community?
The hunting community is more welcoming to newcomers than most people realize. Your hunter education class is the best starting point — instructors are often experienced hunters willing to mentor new participants. Local sportsmen’s clubs, chapters of organizations like the National Wild Turkey Federation or Pheasants Forever (which also support deer habitat), and state-run mentored hunting programs all connect new hunters with experienced guides. Online communities on Reddit, hunting forums, and social media groups are also good resources, though nothing replaces in-person mentorship from someone who hunts the ground near you.
What should I do if I wound a deer and cannot find it?
First, do not panic, and do not keep pushing. If you have lost the blood trail, mark your last confirmed sign and back out. Wait several hours — overnight if it was an evening shot — and return in daylight with fresh eyes. Bring a friend; a second set of eyes on a blood trail is invaluable. Expand your search in a grid pattern from the last blood, focusing on thick cover where a wounded deer would bed down. If you are still unable to recover the animal, contact a local blood-tracking dog handler — many states allow the use of leashed tracking dogs for deer recovery, and handlers often volunteer their services. Never stop trying to recover a wounded deer. It is your ethical obligation as a hunter, and it is the standard we hold ourselves to at Outdoor Benchmark.