Every year, anglers fall through the ice. Some are rescued. Some aren’t. In nearly every case, the story is the same: someone assumed the ice was safe without checking, trusted someone else’s report from days ago, or pushed the season a week too far. Ice safety is non-negotiable. It’s the foundation that every minute of ice fishing is built on, and it deserves more than a quick glance at a chart before you head out.
We’ve fished hard water for decades across the upper Midwest, and we still check ice thickness every single trip. Not because we’re paranoid — because the ice demands respect. Conditions change overnight. A lake that held trucks on Saturday can have soft spots on Wednesday after a warm front pushes through. The anglers who stay safe are the ones who treat every outing as a new assessment rather than relying on last week’s conditions.
This guide covers everything you need to know about ice thickness and on-ice safety — from the numbers that determine whether you should be out there to the gear that brings you home if something goes wrong. If you’re new to the sport, read our ice fishing beginner’s guide for a full overview of gear and technique. But start here first, because none of that matters if you don’t make it off the lake.
Ice Thickness Chart: Minimum Safe Thicknesses
The following guidelines apply to clear, solid, hard ice only — the kind that forms during sustained periods of below-freezing temperatures. This is sometimes called “black ice” because you can see through it to the dark water below. It’s the strongest ice you’ll encounter.
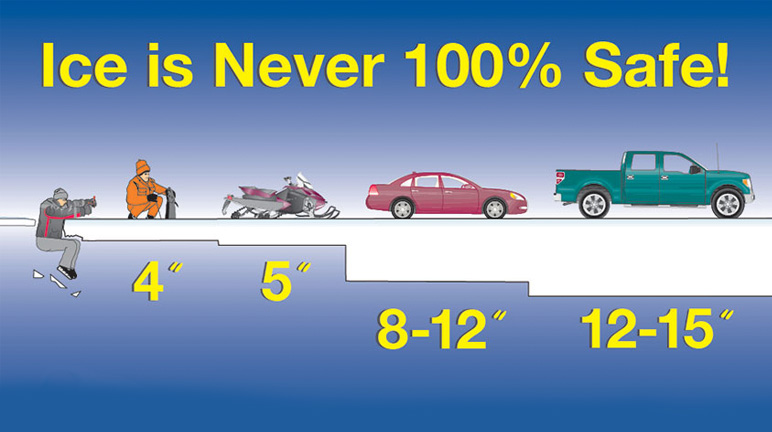
| Ice Thickness | Safe For | Notes |
|---|---|---|
| Under 2 inches | Stay off | No ice activity is safe |
| 4 inches | Walking and ice fishing on foot | Minimum for foot traffic on clear ice |
| 5-7 inches | Snowmobile or ATV | Single machines with spread-out weight |
| 8-12 inches | Small car or light truck | Verify thickness across your entire route |
| 12-15 inches | Medium truck | Requires consistent thickness over a wide area |
These numbers come from decades of data compiled by state DNR agencies, the Minnesota Department of Natural Resources, and the US Army Cold Regions Research and Engineering Laboratory. They represent minimums, not comfort zones. We personally won’t walk out on anything under 5 inches, and we won’t drive on anything under 12 — even if the chart says we could.
White Ice vs. Clear Ice
Here’s where most people get into trouble. White ice (also called snow ice or opaque ice) is roughly half as strong as clear ice. White ice forms when water seeps up through cracks or snow becomes saturated and refreezes. It’s riddled with air pockets that compromise structural integrity.
If you measure 6 inches of ice but 3 of those inches are white ice on top, you effectively have about 4.5 inches of ice strength — clear ice plus half the white ice thickness. That’s barely enough for walking, let alone riding a machine out. Always account for the ice composition, not just the total measurement.
Slush and Layered Ice
Slush between ice layers is another common hazard. Heavy snowfall insulates the ice surface and slows new ice growth. Meanwhile, the weight of the snow pushes the existing ice down, allowing water to seep up through cracks and saturate the snow layer. You end up with a layer of solid ice on the bottom, a layer of wet slush in the middle, and a crust of snow ice on top. The slush layer has essentially zero structural value. Drill through it and measure only the clear, hard ice underneath when making your safety assessment.
Factors That Affect Ice Strength
A frozen lake is not a uniform sheet of concrete. Ice thickness and quality vary across the same body of water, sometimes dramatically, and conditions that were safe yesterday can change overnight. Understanding the factors that weaken ice is just as important as knowing the minimum thickness numbers.
Water Current
Moving water erodes ice from below. River inlets, outlets, narrows between two basins, and areas near bridges or culverts produce thinner, weaker ice than the surrounding lake. The ice may look identical from the surface but measure inches thinner underneath. We avoid these areas entirely during early and late ice, and we check them aggressively during mid-season.
Springs and Underwater Features
Underwater springs pump warmer water toward the surface and prevent ice from forming properly. Some lakes have known spring locations that local anglers can point you to — ask at bait shops and listen carefully. Areas over deep holes, drop-offs, and structures where current flows can also produce inconsistent ice. If you’re fishing a new lake, check thickness more frequently than you think is necessary.
Snow Cover
Snow acts as an insulator. Areas with heavy snow cover freeze more slowly than wind-swept areas where bare ice is exposed to cold air. This means the middle of a bay sheltered from wind may have significantly thinner ice than the wind-blasted main lake points. After a heavy snowfall, ice growth can stall or even reverse if the snow’s weight pushes the ice sheet down and water floods the surface.
Temperature Swings
A sustained cold snap builds strong, thick ice. A warm front, rain event, or above-freezing temperatures — even for a day or two — can compromise it. Ice doesn’t weaken linearly with temperature. A single warm day can introduce meltwater into cracks and structural points, and when it refreezes, the new ice is weaker than what was there before. Pay attention to the forecast, not just the current temperature.
Pressure Cracks and Ridges
Pressure cracks form when ice sheets expand and contract with temperature changes. They’re visible as lines running across the ice surface, sometimes ridged up several inches. While pressure cracks don’t automatically mean the ice is unsafe, the ice immediately adjacent to a crack is often thinner and weaker. Cross them carefully and perpendicular to the crack line if you must.
Sun Exposure
South-facing shorelines and areas that receive direct afternoon sun can thin faster than shaded areas, especially in late season. Dark objects frozen into the ice — sticks, leaves, debris — absorb solar radiation and create weak spots around them. Late in the season, ice that looks thick from above can be “honeycombed” internally by sun degradation, turning it into a lattice of vertical crystals that has almost no load-bearing capacity despite appearing thick.
How to Check Ice Thickness
Never trust someone else’s ice report as your sole source of information. Ice conditions change between the time of their report and the time of your arrival. Always verify thickness yourself, starting at the shoreline and checking repeatedly as you move farther out.
The Spud Bar
A spud bar (also called an ice chisel) is a heavy steel bar with a sharpened chisel point on one end. It’s the oldest and most reliable ice-checking tool in the game. The technique is simple: strike the ice ahead of you with a firm overhead chop as you walk. If the bar punches through on a single strike, the ice is too thin and you need to turn around. If it takes multiple hard strikes to penetrate, you’re on solid ice.
We carry a spud bar from the truck to the fishing spot on every trip during early and late ice. During mid-season, when we’re confident in base ice thickness, we rely more on the auger. But the spud bar is the tool you want when you’re exploring new areas or conditions are uncertain.
The Ice Auger
Your ice auger does double duty as a safety tool. Drill a hole and measure the ice thickness using a tape measure or a dedicated ice thickness gauge — a simple L-shaped tool you lower into the hole and pull up against the bottom of the ice. Measure at your access point, then again at 50-yard intervals as you move toward your fishing spot. If thickness drops below your comfort level at any point, stop and reassess.
The Ice Chisel Method
For anglers who don’t want to carry a full-length spud bar, a shorter ice chisel serves a similar purpose. It won’t test ice as aggressively as a heavy spud bar, but it allows you to chip at the surface and gauge hardness and quality. Pair it with an auger for actual thickness measurements once you’ve confirmed the surface ice is solid enough to stand on.
When and Where to Check
- Always check near shore first. Shoreline ice is often the weakest due to fluctuating water levels, sun exposure, and ground heat.
- Check at regular intervals as you walk out. Don’t just check once and assume the ice is uniform for the next quarter mile.
- Re-check if you change areas. Moving from a main lake point to a sheltered bay means entirely different ice conditions.
- Check again on the way back, especially during warm afternoons in late season. Ice that held you at 7 AM may have softened by 2 PM.
What to Carry for Ice Safety
Every piece of safety gear we’re about to list should be on your person — not in the sled, not in the shelter, not in the truck. If you go through the ice, you won’t have time to dig through a gear bag. This is your baseline kit, every trip, no exceptions.
Ice Picks (Ice Claws)
Ice picks are two spiked handles connected by a cord that you wear around your neck. If you fall through, you dig the spikes into the ice surface and use them to pull yourself out. Without ice picks, pulling yourself onto a flat ice surface from the water is nearly impossible — your hands are wet, numb, and can’t grip the smooth surface. Ice picks cost under $10 and are the single most important piece of ice safety gear you will ever own. Wear them outside your jacket where you can grab them instantly.
Throw Rope
A 50-foot throw rope in a compact bag clips to your belt or jacket. If your partner falls through, you throw the rope from a safe distance rather than approaching the compromised ice. Approaching a hole where someone has fallen through is one of the most dangerous things you can do — the ice that failed for them will fail for you too.
Float Suit or Float-Assist Bibs
A float suit or float-assist bibs provide buoyancy if you go through the ice, keeping your head above water and buying you critical time. They also provide insulation that slows heat loss. We consider float-assist bibs mandatory gear for early and late ice and strongly recommended during mid-season. The best options function as high-performance cold-weather outerwear first and flotation devices second — you don’t sacrifice comfort for safety.
Whistle
A simple whistle on a lanyard around your neck. Sound carries across frozen lakes far better than a voice, especially when hypothermia is setting in and your ability to shout is compromised. A whistle requires almost no energy to use, and it cuts through wind and distance.
Additional Items
- Fully charged phone in a waterproof case, stored in an inside pocket where body heat maintains battery life
- Dry clothes in a waterproof bag stored in your sled — a dry base layer can prevent hypothermia after a cold-water immersion
- Cleats or ice creepers for traction on bare ice, preventing falls that can cause injury or send gear through a hole
Self-Rescue: What to Do If You Fall Through
Knowing how to self-rescue is not optional knowledge. Review this process before every season, and practice it mentally until it’s automatic. In a real scenario, you’ll have about one minute before cold shock subsides and maybe ten to fifteen minutes of meaningful hand function before hypothermia takes over. You don’t have time to think through the steps — they need to be muscle memory.
Step 1: Control Your Breathing
The moment you hit cold water, your body’s gasp reflex will try to make you inhale sharply. Fight it. Keep your mouth closed, control your breathing, and resist the urge to thrash. Cold shock passes in about 60 to 90 seconds. Focus on slow, deliberate breaths.
Step 2: Orient Yourself
Turn to face the direction you came from. The ice behind you held your weight — the ice in front of you (the direction you were heading) did not. You want to pull yourself out onto ice that has already proven it can support you.
Step 3: Use Your Ice Picks
Get your ice picks out and dig them into the ice surface as far ahead of you as you can reach. Kick your legs to get your body as horizontal as possible — you’re essentially trying to swim up onto the ice surface, not climb a wall. Drive the picks in, kick hard, and pull yourself forward. Repeat until your torso is on the ice.
Step 4: Roll Away
Once your body is on the ice, do not stand up. Roll away from the hole to distribute your weight across a wider area. Keep rolling until you’re well clear of the compromised zone — at least 15 to 20 feet — then crawl on your hands and knees back toward shore. Only stand when you’re on ice you’re confident can hold you.
Step 5: Address Hypothermia Immediately
Get to shelter, get out of wet clothes, and get into dry layers as fast as possible. If you drove, start your vehicle and crank the heat. Hypothermia can kill you even after you’ve pulled yourself from the water. This is where those dry clothes in the waterproof bag earn their place in your kit.
Early Ice vs. Late Ice: The Most Dangerous Periods
Mid-winter ice fishing, when temperatures have been consistently below freezing for weeks and ice thickness is well-established, is the safest period of the season. The danger spikes at both ends: early ice (the first fishable ice of the season) and late ice (the final weeks before ice-out in spring).
Early Ice Risks
Early ice is when excitement overrides judgment. Anglers who have been waiting months to get back on the hard water push out the moment they hear someone else caught fish. But early-season ice is inconsistent. It may be 5 inches thick in one area and 2 inches thick 50 yards away. Current areas, springs, and areas with dark-bottomed shallows (which absorb heat) can have dangerously thin ice surrounded by fishable ice. During early ice:
- Check thickness obsessively. Every 20 to 30 yards is not too often.
- Fish close to shore. You don’t need to be in the middle of the lake. Fish are often shallow during early ice, feeding actively in the newly frozen shallows.
- Go early in the day. Morning ice is harder than afternoon ice after sun exposure.
- Keep your group spread out. Don’t concentrate weight in one area.
Late Ice Risks
Late ice is arguably more dangerous than early ice because it looks deceptive. A lake may still have 18 inches of ice measured by a tape, but if that ice has been honeycombed by sun, warm temperatures, and repeated freeze-thaw cycles, it can have the structural integrity of a snow cone. Late-season ice fails catastrophically — instead of cracking and sagging, it can simply disintegrate under your weight with no warning.
Watch for these late-ice warning signs:
- Candling: Ice takes on a crystalline, columnar structure that you can break apart with your hands
- Standing water on the surface: Indicates the ice is saturating and losing structure
- Dark, wet-looking ice: The ice is absorbing heat and rotting from within
- Shoreline separation: Open water between the ice sheet and shore means the ice is actively receding
When you start seeing these signs, the season is over. No fish is worth it.
Teaching Kids Ice Safety
Getting kids into ice fishing is one of the great joys of the sport, but it comes with a heightened responsibility to manage safety. Children are lighter than adults (which is actually a small advantage from a pure weight-on-ice perspective), but they’re also less experienced, more likely to wander, and less capable of self-rescue if something goes wrong.
Start With the Rules
Before a child ever steps onto ice, they need to understand three non-negotiable rules:
- Never go on the ice without an adult. Not with friends, not if the neighbor said it’s fine, not ever.
- Always stay where the adult can see and reach you. No wandering off to explore.
- If the adult says we’re leaving, we leave. No arguments, no “five more minutes.”
Demonstrate Ice Checking
Let kids watch you check ice thickness and explain what you’re doing and why. Hand them the spud bar on solid ice and let them feel the difference between striking 8-inch ice and chipping at thinner ice near shore. Hands-on understanding sticks better than lectures.
Equip Them Properly
Kids need ice picks sized for their hands, worn around their neck on every trip. Practice the self-rescue steps on dry land — get on the ground, show them the kick-and-pull motion, have them practice rolling away. Make it a game if you need to, but make sure they know the sequence.
Keep First Trips Short and Close
Fish near shore, within easy walking distance of the vehicle. Early trips should be about fun and learning, not about pushing farther out for better fishing. A kid who associates ice fishing with warmth, hot chocolate, and catching panfish will want to come back. A kid who associates it with fear and cold will not.
Frequently Asked Questions
How thick should ice be before you walk on it?
A minimum of 4 inches of clear, solid ice is the widely accepted standard for safe foot travel, including walking out to an ice fishing spot. This applies exclusively to clear, hard ice — not white ice, snow ice, or layered ice with slush. If the ice composition includes white or opaque ice, you need significantly more total thickness to achieve the same load-bearing capacity. We personally prefer at least 5 inches before walking out and carry a spud bar to test ice ahead of us throughout the walk.
Can you drive a truck on 12 inches of ice?
Twelve inches of clear, solid ice is generally considered the minimum for a full-size car or light pickup truck. For a medium or heavy truck, most safety guidelines recommend 12 to 15 inches minimum. However, thickness alone doesn’t tell the full story. The ice needs to be consistent across your entire travel route — a thin spot in one area can fail even if the ice around it is thick. You also need to account for ice quality, load duration (parked vehicles stress ice more than moving ones), and how many other vehicles are nearby. Many experienced anglers who drive on the ice use well-established roads that are checked and maintained regularly.
What is the most dangerous time for ice fishing?
The first ice of the season (early ice) and the last ice before spring breakup (late ice) are the two most dangerous periods. Early ice is hazardous because thickness is inconsistent and anglers are eager to get out before conditions are truly safe. Late ice is dangerous because even thick ice can become structurally compromised through honeycombing and internal degradation, making it look safe while having minimal load-bearing strength. The majority of ice-related drownings occur during these transitional periods.
How do you know if ice is safe without measuring?
You can’t know with certainty without measuring, and we strongly recommend always measuring. That said, there are visual and environmental cues that indicate danger. Clear, dark ice that formed during a sustained cold snap is generally strong. White, opaque, or grey ice is weaker. Standing water on the surface, visible cracks with water welling up, slushy areas, and ice that flexes underfoot are all immediate warning signs to retreat. Hearing cracking sounds as you walk doesn’t always mean the ice is failing — thermal expansion causes cracking in thick, safe ice — but if cracks are accompanied by flexing or water movement, back off immediately.
What should you do if someone falls through the ice?
Do not run to the edge of the hole. The ice that failed for them will likely fail for you. Instead, call 911 immediately, then attempt a rescue from a safe distance. Throw a rope, extend a branch or pole, push a ladder or sled toward the person — anything that allows you to help while staying on solid ice. If you must approach, lie flat on your stomach to distribute your weight and crawl toward the hole. Once the person is out, get them to warmth and dry clothing immediately, and seek medical attention even if they feel fine — afterdrop hypothermia can set in after the initial rescue.