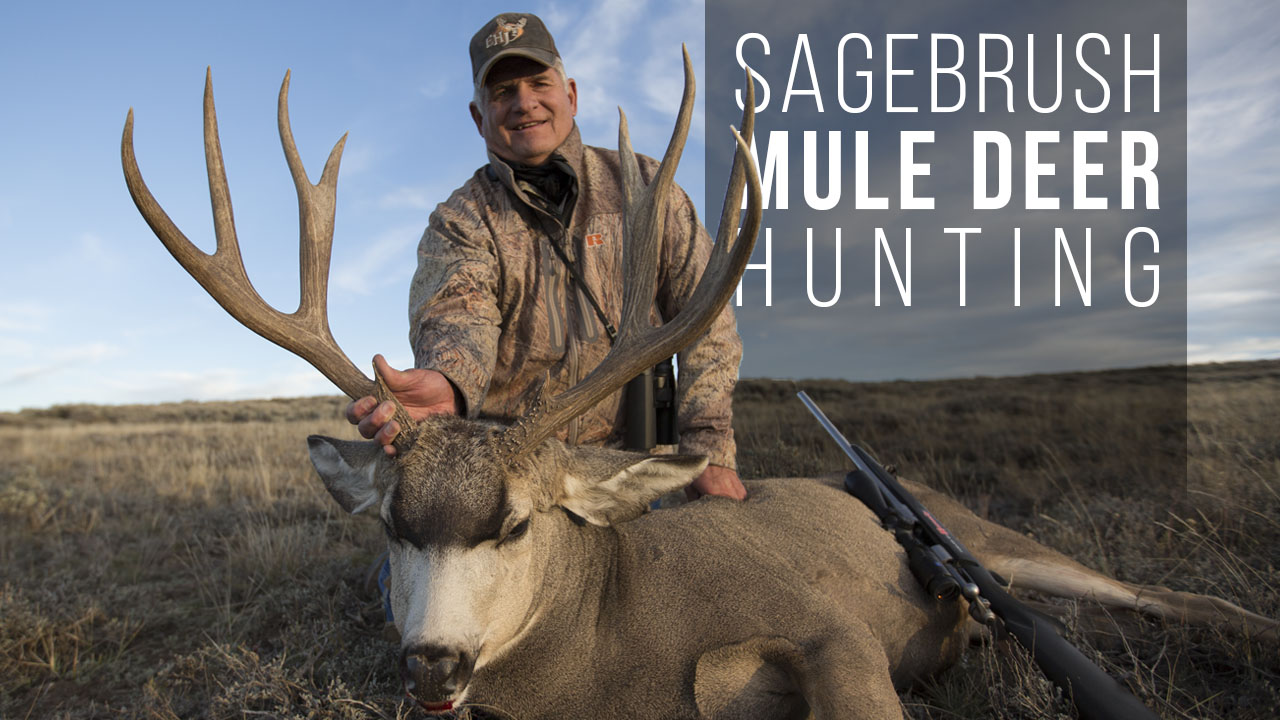
Mule deer hunting is western hunting distilled to its purest form. There are no food plots, no box blinds, and no narrow shooting lanes cut through hardwoods. There is open country — miles of it — broken by sage, juniper, coulees, alpine basins, and rimrock that drops into shadows where bucks bed with their backs to the wind and their eyes covering everything below. Finding a mature mule deer buck on public land requires you to cover ground, use your optics harder than you have ever used them, and make decisions under physical stress at distances that demand precision. It is one of the most challenging and satisfying pursuits in North American hunting.
We have chased mule deer across Colorado, Wyoming, Montana, Idaho, and Nevada on public land for years, from early September velvet hunts in the high country to late November rifle seasons in the breaks. We have glassed until our eyes burned, blown stalks on bucks we spent hours getting close to, and connected on deer we had no business finding in country that looked empty from the truck. This guide covers the full picture — mule deer behavior, spot-and-stalk tactics, glassing strategy, rifle and optics choices, public land approaches, seasonal tactics, shot placement, and field care at elevation. If you are new to big game hunting entirely, start with our whitetail hunting beginners guide for foundational concepts, then come back here when you are ready to head west. For how we evaluate and test gear across all categories, visit our methodology page. For more big-game content, see our big-game hunting hub.
Understanding Mule Deer Behavior
Before you can hunt mule deer effectively, you need to understand what makes them fundamentally different from whitetails. Mule deer are a product of open, vertical terrain. Their survival strategy is built around vision and elevation rather than concealment and evasion. This shapes everything about how you hunt them.
Habitat and Home Range
Mule deer occupy an enormous range of habitat types across the western half of North America. You will find them in high alpine basins above timberline, in dark timber on north-facing slopes, in sagebrush flats and juniper-studded foothills, in desert canyon systems, and in the agricultural breaks of eastern Montana and the Dakotas. What ties these habitats together is the combination of security cover for bedding, open terrain for feeding, and reliable water sources within reasonable travel distance.
Unlike whitetails, which often live their entire lives within a square mile, mule deer can have home ranges of 10 to 30 square miles or more, depending on habitat quality and the severity of seasonal migration. In mountainous terrain, mule deer may summer above 10,000 feet and winter below 6,000 feet, traveling 20 to 50 miles between seasonal ranges. This migratory behavior means the deer you scout in August may not be in the same drainage — or even the same mountain range — when your October tag is valid. Understanding the timing and routes of these migrations in your specific unit is critical to finding deer when it matters.
Feeding Patterns
Mule deer are browsers, not grazers. Their diet consists primarily of forbs, shrubs, and browse rather than the agricultural crops and grasses that whitetails favor. In summer and early fall, they feed heavily on forbs and the leaves of shrubs like bitterbrush, mountain mahogany, and serviceberry. As fall progresses and vegetation cures, they shift to woody browse — sagebrush becomes a dietary staple in winter across much of their range.
Feeding activity follows a predictable pattern. Mule deer feed most actively during the first and last two hours of daylight, with the heaviest movement typically occurring in the final 45 minutes before dark. Midday feeding is rare outside of the rut or extreme cold weather that forces deer to increase caloric intake. Between feeding bouts, bucks move to their bedding areas — usually uphill and into cover — where they spend the middle of the day chewing cud and watching the terrain below.
Bedding Behavior
Understanding how mule deer bucks bed is perhaps the single most important tactical concept for a spot-and-stalk hunter. Mature bucks do not bed randomly. They select bedding locations that maximize their ability to detect predators through a combination of wind, vision, and terrain advantage.
A classic mule deer buck bed is located on a point, bench, or shelf partway up a slope with wind at the deer’s back and a clear visual field covering the approach from below. The buck lets the wind handle anything coming from behind while his eyes cover everything in front. If the terrain forces an approach from the side, the buck often beds near a cliff edge, rock outcrop, or patch of dense vegetation that blocks the lateral approach. When a bedded mule deer detects danger, its first move is usually to go uphill — climbing toward the ridgeline and dropping over the backside into the next drainage.
This bedding strategy means that most direct approaches from below are doomed. The deer sees you long before you are in rifle range. Successful stalks almost always require getting above the buck or approaching from the same elevation on the downwind side, using terrain features to break line of sight during the final approach.
The Rut
The mule deer rut typically peaks in mid to late November, though timing varies by latitude and elevation. Unlike whitetail bucks, which establish and patrol scrape lines and travel widely searching for individual does, mule deer bucks tend to locate groups of does and stay with them. A mature muley buck during the rut will often be found with a harem of three to eight does, defending them from rival bucks and breeding receptive females over a period of days before moving to find another group.
Rutting behavior makes bucks more visible and more vulnerable than at any other time of year. Bucks that spent the summer and early fall in bachelor groups at high elevation descend to where the does are — often in lower-elevation sage flats, agricultural edges, and transitional habitat between summer and winter range. They move more during daylight, respond less cautiously to disturbance, and occasionally engage in sparring matches or full fights that can be spotted and heard from considerable distance. If your tag timing coincides with the rut, your odds of finding a mature buck during legal shooting hours increase dramatically.
Spot-and-Stalk Tactics: The Core Method
Spot-and-stalk is the defining method of western mule deer hunting. The concept is simple: find a buck with your optics from a distance where he cannot detect you, plan an approach using terrain and wind, close the distance to shooting range, and make the shot. The execution is anything but simple, and it is where years of experience, physical conditioning, and discipline under pressure separate hunters who consistently kill good bucks from those who consistently blow stalks.
Choosing a Vantage Point
Your stalk begins long before you start moving toward a buck. It begins with where you set up to glass. A productive vantage point has several characteristics. First, it provides a wide field of view covering multiple drainages, slopes, or basins. You want to see as much country as possible from a single position. Second, it is high enough to look down into bedding terrain rather than trying to spot deer against a skyline from below. Third, it is reasonably comfortable — you may spend two to six hours on a single glassing point, and if you cannot sit still, you will not glass thoroughly. Fourth, it has a viable exit that lets you begin a stalk without being seen by deer you have already located.
The best vantage points are often ridgelines, mesa edges, or high benches that overlook opposing slopes. Position yourself just below the skyline — never silhouette yourself against the sky — and set up in a shadow or against a rock or tree that breaks your outline. You should be invisible to any deer in the country you are glassing.
Planning the Stalk
Once you have located a buck worth pursuing, the temptation to start moving immediately is powerful and must be resisted. The planning phase is where most stalks are won or lost. Before you take a single step, you need to answer four questions:
Where exactly is the buck? Mark the deer’s position relative to identifiable terrain features — a specific rock, a lone tree, a particular fold in the terrain. Distances and shapes change dramatically once you drop off your vantage point and enter the terrain at the deer’s level. If you lose your reference points, you will either walk right past the buck or bump him without ever knowing he was there.
What is the wind doing? Check the wind at your position and anticipate what it will be doing at the buck’s level and along your approach route. In mountain terrain, thermals add a layer of complexity. Morning thermals generally pull air downhill as cool air settles into drainages. As the sun heats the slopes, thermals reverse and push air uphill, usually stabilizing by mid-morning. Plan your stalk so that you are never upwind of the buck during the final approach.
What terrain features will hide your approach? You need continuous cover from the deer’s line of sight for the entire stalk. This might be a ridge spine, a draw, a stand of timber, a rock outcrop, or simply a fold in the terrain that is deep enough to conceal your profile. Identify each piece of cover in sequence and plan your route from one to the next, like stepping stones.
Where will you take the shot from? Pick a shooting position before you begin the stalk. This is the point where your cover runs out and you will need to be within range and have a clear shooting lane to the deer’s location. Know the approximate distance, and know what rest options are available — a rock, a pack, shooting sticks, or prone if the terrain allows it.
Executing the Stalk
Move slowly and deliberately. The biggest mistake stalking hunters make is moving too fast. Speed creates noise, exposes your profile, and leaves you winded and shaking when you need to shoot. Use every piece of terrain to stay hidden. When crossing open ground between cover features, stay low, move during moments when the buck’s head is down or turned away, and freeze instantly if the deer looks in your direction. Mule deer detect motion at extraordinary distances — a moving human on an open slope can be spotted at half a mile or more by a vigilant buck.
If the wind shifts during your stalk, stop. Reassess. If the new wind direction will carry your scent toward the buck, you have two options: wait for the wind to return to a favorable direction, or abort. Pushing a stalk with bad wind is not aggressive — it is wasteful. You will blow the deer out of the area and eliminate any chance of a second approach.
Glassing Strategy
Optics do the hunting in mule deer country. Your binoculars and spotting scope are your most important tools, and the hours you spend behind them are the hours that produce deer. Lazy or unfocused glassing is the number one reason hunters drive home with an unfilled tag and the impression that there were no deer in the area.
When to Glass
The first and last 90 minutes of daylight are the highest-percentage glassing windows. Deer are feeding and moving, which makes them visible against the terrain. Morning light is generally better for glassing west-facing slopes, and evening light favors east-facing slopes, as the low sun angle illuminates the deer’s body against shadowed terrain.
Do not stop glassing during the middle of the day. While deer are bedded and less visible from 9 AM to 3 PM, this is when patient, systematic glassing with a spotting scope pays its highest dividends. Bedded bucks can be located by spotting an antler tip, an ear flick, the horizontal line of a deer’s back against a slope, or the slight color difference of a deer’s body against sage or rock. Midday glassing is tedious and straining, but the buck you find bedded at noon is the buck you stalk and kill at 1 PM while every other hunter is back at camp eating lunch.
How to Glass Systematically
Effective glassing is methodical and slow. Pick a section of terrain — a slope, a basin, a draw — and work it in a grid pattern. Start at one edge and sweep horizontally, pausing every few degrees to study what you see. Then shift your elevation slightly and sweep back. Overlap your passes. You are not scanning for a whole deer standing broadside in the open. You are looking for pieces of a deer: the curve of a back, the white of a rump patch, the glint of an antler, the flick of an ear, a shape that does not match the surrounding vegetation.
Use your binoculars for the initial scan to cover ground quickly and locate areas of interest. When you find something worth investigating — a suspicious shape, an area that looks like prime bedding habitat, a doe group that may have a buck nearby — transition to your spotting scope to study it in detail. A quality 15-45x or 20-60x spotting scope is indispensable for confirming what a deer is and evaluating antler quality at distances where binoculars show only a blob. For our top spotting scope recommendations for this style of hunting, see our best spotting scopes for western hunting roundup.
What to Look For
Terrain tells you where to concentrate your glassing effort. Focus on:
- North-facing slopes in early season, where shade and moisture keep vegetation green and temperatures tolerable.
- Transition zones between cover types — the edge where timber meets sage, where a draw opens into a flat, where rimrock drops into a brushy bench.
- Water sources. In arid mule deer country, springs, stock tanks, and small creeks concentrate deer activity. Glass the surrounding 300 yards thoroughly.
- Points and benches partway up slopes, especially those with scattered cover. These are classic bedding locations.
- Doe groups. During the rut, find the does and you will find the bucks. But even outside the rut, doe presence confirms that the habitat is being used.
Caliber and Rifle Considerations
Mule deer are not particularly large or tough animals — a mature buck weighs 150 to 250 pounds depending on subspecies and region — but the distances and conditions of western hunting demand a flat-shooting, wind-resistant cartridge paired with a rifle you can shoot precisely from field positions.
The most popular and effective mule deer cartridges include the 6.5 Creedmoor, 6.5 PRC, .270 Winchester, .280 Ackley Improved, 7mm Remington Magnum, and .300 Winchester Magnum. All of these offer the combination of moderate recoil, flat trajectory, and sufficient energy to cleanly kill a mule deer at the distances western hunting demands. For a detailed comparison of these and other options, our hunting caliber guide breaks down the ballistics, recoil, and practical trade-offs.
If we had to pick one cartridge for a dedicated mule deer rifle, we would choose the 6.5 PRC or .280 Ackley Improved. Both offer outstanding ballistic performance to 600 yards and beyond while keeping recoil manageable enough that most shooters can maintain composure through the shot. However, the honest truth is that any of the cartridges listed above will kill a mule deer cleanly at any ethical range. The rifle and your ability to shoot it accurately from field positions matter far more than the specific cartridge printed on the barrel.
Your rifle should wear a quality scope with enough magnification to identify and place shots at 300 to 500 yards, but not so much that field of view and eye box become problematic. A 4-16x or 5-25x variable scope covers the full range of mule deer hunting scenarios. Invest in a scope with exposed, reliable turrets if you plan to dial for longer shots, and zero your rifle at a distance that minimizes holdover for the range band you expect to shoot — 200 yards is a common and practical zero for most western deer setups. For a detailed guide to scope selection, including turret types and reticle choices, see our how to choose a rifle scope guide.
Optics Setup for Mule Deer Hunting
We have said it already and we will say it again: optics are the most important equipment in your mule deer hunting kit. The right glass finds deer. The wrong glass or insufficient glass means you walk past bucks you never see.
Binoculars
A quality pair of 10x42 binoculars is the foundation of your optics system. These are the glass you will spend the most time behind — hours every day. Optical clarity, color fidelity, and edge sharpness matter enormously when you are trying to pick apart a sagebrush slope at 800 yards looking for a piece of a bedded deer. The Vortex Viper HD 10x42 hits the sweet spot of optical quality and value for serious western hunters. It is the binocular we recommend most often for mule deer hunting because it delivers glass performance that competes with optics costing twice as much. Read our full Vortex Viper HD review for the detailed breakdown.
Some hunters prefer 12x50 binoculars for the added magnification and light-gathering in open country. The trade-off is weight, bulk, and the need for a tripod adapter or support to hold them steady. If you are primarily a glassing hunter who sets up on vantage points for extended sessions, 12-power binoculars on a tripod adapter can function as a partial substitute for a spotting scope in some situations. For most hunters, 10x42 is the most versatile choice.
Spotting Scope
A spotting scope in the 15-45x or 20-60x range is essential for western mule deer hunting. It confirms what your binoculars suspect — that shape in the sage is a buck, those are four points on one side, that deer is bedded facing left with a clear shot to the vitals. The spotting scope also allows you to study terrain features along your stalk route from a distance, identifying potential obstacles or sight-line problems before you commit. We ranked and tested the best options in our best spotting scopes for western hunting guide.
Mount your spotting scope on a compact, stable tripod. Trying to use a spotting scope without a tripod at 40x magnification is an exercise in frustration — the image shakes so badly you cannot resolve detail. A lightweight carbon fiber tripod with a fluid head provides the stability you need without punishing your pack weight.
Rangefinder
A laser rangefinder is not optional for western mule deer hunting. Distances in open country are deceptive, and a 50-yard error in range estimation at 400 yards can mean the difference between a clean kill and a miss or, worse, a wound. Carry a rangefinder that is rated to at least 1,000 yards on reflective targets and delivers reliable readings on deer-sized animals at 600 yards or more. Rangefinders with built-in ballistic calculators add convenience but are not strictly necessary if you know your rifle’s drop chart.
Public Land Strategies
The majority of mule deer hunting in the West happens on public land — national forest, BLM, state trust land, and wilderness. This is both a tremendous opportunity and a tactical challenge. The land is open to everyone, which means the deer contend with hunting pressure from the moment seasons open. Your strategy must account for other hunters as a variable in every decision you make.
Dealing with Hunting Pressure
Pressure reshapes mule deer behavior rapidly. Bucks that fed openly on sage flats during the summer become nocturnal or semi-nocturnal within days of the season opener. They move into heavier cover, bed in positions with more escape routes, and shift their activity to the margins of daylight. The more accessible the terrain, the faster and more dramatically this behavioral shift occurs.
Your advantage as a committed, physically prepared hunter is your willingness to go where other hunters will not. This usually means more miles, more elevation gain, and more discomfort. Three to five miles from the nearest road or trailhead, hunting pressure drops dramatically on most public land. Beyond that distance, you are likely to have the country to yourself.
E-Scouting and Unit Research
Before you set foot in the field, spend serious time studying your unit digitally. Use platforms like onX Hunt, Google Earth, and your state’s wildlife agency harvest data to answer the key questions: where is the public land, what does the terrain look like, where are the access points, and how productive has the unit been historically.
Pull three to five years of harvest statistics to identify units with consistent buck harvest. Look for units where the buck-to-doe ratio is reasonable and the harvest age structure suggests that some bucks are reaching maturity — this information is available in many states’ herd management reports. Cross-reference productive units with public land access. A unit with excellent deer numbers but 80 percent private land is useless unless you can secure permission.
When e-scouting terrain, look for the features we described in the bedding behavior section: north-facing slopes with scattered cover, benches and points partway up drainages, and transition zones between cover types. Mark potential glassing points, water sources, and access routes. Identify two or three distinct areas within a unit so you have options if your primary area is unproductive or occupied by other hunters.
Access and Approach
How you enter a unit matters. Most hunters park at the obvious trailhead, hike the maintained trail, and hunt within a mile of the path. If you want to find undisturbed deer, approach from unexpected angles. Study the map for access points that require a longer drive on rough roads, a creek crossing, or a steep initial climb that deters casual effort. Park early — be hiking by at least an hour and a half before first light — so you are on your glassing point when the deer are still feeding in the open.
Early Season vs. Late Season vs. Rut Tactics
Mule deer behavior shifts dramatically through the fall, and your tactics need to shift with it. Hunting the same way in September as you do in November is a recipe for frustration.
Early Season (August-September)
Early archery and velvet rifle seasons target bucks in their summer patterns. Deer are at their highest elevations, often above 9,000 feet in mountain terrain, feeding in alpine meadows, high basins, and the upper edges of timber. Bachelor groups of bucks are common, and the deer are relatively predictable. Water sources are productive for ambush-style setups where terrain allows. The primary challenge of early season is heat — warm temperatures push activity to the extreme margins of daylight and make midday hunts unproductive. Focus your effort on the first and last two hours of the day and use the middle hours for scouting and repositioning.
Mid-Season (October-Early November)
This is often the toughest time to hunt mule deer. Summer patterns have broken, bachelor groups have dispersed, and the rut has not yet consolidated bucks around doe groups. Deer are migrating or shifting between summer and winter ranges, and their locations can change day to day. Pressure from early seasons has pushed bucks into more cautious behavior. Mid-season success depends on finding transition corridors, fresh sign, and the pockets of habitat where displaced bucks settle temporarily. This is where your e-scouting investment pays off — knowing the terrain deeply enough to predict where deer will be as conditions change.
Rut (Mid-November-Early December)
The rut transforms mule deer hunting. Bucks abandon caution, travel during daylight, and concentrate around doe groups in wintering habitat. Glassing becomes extraordinarily productive because mature bucks that were invisible for weeks suddenly appear in open terrain, chasing does or standing guard over a harem. Focus on areas with high doe density — lower-elevation sage flats, agricultural margins, and south-facing slopes where does congregate as winter approaches. Glass extensively and be ready to move quickly when a shooter buck appears. Rutting bucks can cover a mile in minutes, so the window between spotting a buck and getting into position for a stalk can be narrow.
Shot Distances and Shot Placement
Mule deer hunting involves longer average shot distances than most eastern whitetail hunting. Shots inside 200 yards are a gift. Shots between 200 and 400 yards are common. Shots beyond 400 yards are not unusual for experienced, well-practiced western hunters, though we strongly encourage newer hunters to keep their maximum range under 400 yards until they have verified their precision from field positions at those distances.
Know Your Limits
Your ethical maximum range is not the farthest distance at which you can hit a steel plate at the range from a bench rest. It is the farthest distance at which you can reliably place a shot within a six-inch circle from whatever field position the terrain provides — sitting, kneeling, prone, or off shooting sticks — under the stress and fatigue of a real hunting situation after a stalk. Be honest with yourself about this number. Practice from field positions at realistic distances before the season, and do not stretch beyond your verified capability in the moment.
Shot Placement
The vital zone on a mule deer is roughly the same as any other North American deer. A broadside shot should place the bullet immediately behind the front shoulder, one-third of the way up from the bottom of the chest. This targets the heart and lungs and provides the largest margin of error. A slightly quartering-away shot is also excellent — aim for the opposite shoulder, driving the bullet through both lungs and often the heart.
Avoid quartering-to shots unless you are experienced with bullet placement angles and confident in your bullet’s ability to penetrate the near shoulder and reach the vitals. Avoid head and neck shots entirely — the vital area is too small and the risk of a non-lethal jaw or spine wound is unacceptable.
Wait for the shot. A bedded buck will stand eventually. A walking buck will stop eventually. A buck that is slightly quartered toward you may turn. Patience in shot selection prevents more wounded and lost animals than any other factor.
Field Care at Elevation
Getting your deer down is only half the work. Getting the meat processed and cooled in the backcountry, often at elevation and miles from a road, is where preparation and efficiency determine whether you bring home quality table fare or lose meat to heat and spoilage.
Cool the Meat Quickly
In the thin air and often-warm conditions of western mule deer country, getting core body heat out of the animal quickly is your top priority. Field dress the deer immediately after recovery. If you are in warm early-season conditions — daytime temperatures above 50 degrees — consider quartering the animal in the field rather than dragging it whole. Remove the quarters, backstraps, and tenderloins, and get them into breathable game bags hung in shade with airflow. Game bags protect the meat from insects and dirt while allowing air circulation that promotes cooling.
If nighttime temperatures drop below 40 degrees, you can hang quartered meat overnight and it will cool thoroughly. If temperatures remain warm day and night, you need to get the meat to refrigeration within 12 to 18 hours. Plan your packout timeline accordingly.
Packing Meat Out
On a backcountry mule deer hunt, you are your own pack mule. A mature buck yields roughly 60 to 80 pounds of boneless meat plus the cape and antlers if you are keeping them. This typically requires two to three trips if you are packing solo, or one to two trips with a partner. A frame pack with a load shelf is essential for hauling quarters — your daypack is not designed for this task and will destroy your back and hips trying.
Debone in the field to reduce pack weight. You do not need to carry leg bones, the pelvis, or the ribcage out of the backcountry. Remove all usable meat from the bone, bag it, and pack it efficiently. Label your game bags with the contents if your state requires proof of sex to be attached to a specific quarter.
Tagging and Regulations
Before you cut anything, attach your tag to the animal as required by your state’s regulations. Many western states have moved to electronic tagging via phone apps, but some still require a physical carcass tag. Know your state’s requirements before you are kneeling next to a deer in a drainage with no cell service. Some states also have specific requirements about leaving evidence of sex naturally attached to a quarter until the meat reaches your home or a processor.
Frequently Asked Questions
What is the best caliber for mule deer hunting?
There is no single best caliber, but the most versatile and popular choices are the 6.5 Creedmoor, 6.5 PRC, .270 Winchester, and 7mm Remington Magnum. All offer flat trajectories, manageable recoil, and more than enough energy to cleanly kill a mule deer at any ethical range. The best caliber is the one you shoot most accurately from field positions. Our hunting caliber guide provides a detailed breakdown of ballistic performance and practical trade-offs across all common deer cartridges.
How far do you typically shoot mule deer?
Average shot distances vary by terrain and method. Most spot-and-stalk mule deer shots fall between 200 and 400 yards. Shots inside 200 yards happen when terrain allows a close stalk into a bedding area. Shots beyond 400 yards are taken by experienced hunters who have verified their precision at those distances from field positions. We recommend new western hunters keep their maximum range under 400 yards and focus on stalking closer rather than shooting farther.
What binoculars do you recommend for mule deer hunting?
A quality 10x42 binocular is the standard for western mule deer hunting. We recommend the Vortex Viper HD 10x42 as the best value in its class — it delivers optical performance that competes with significantly more expensive glass. Pair it with a spotting scope for confirming distant deer and evaluating antler quality. Our best spotting scopes for western hunting guide covers the top options.
Can you hunt mule deer on public land without a guide?
Absolutely. The majority of mule deer hunters in the West are DIY hunters on public land. The keys to success without a guide are thorough e-scouting, physical preparation, willingness to hike beyond the crowds, and a commitment to putting in the glassing hours. Study your unit’s harvest data, learn the terrain digitally before you arrive, and plan multiple hunting areas within the unit so you can adapt if your primary spot is unproductive or pressured. Our backcountry elk hunting guide covers many of the same DIY public land preparation strategies that apply directly to mule deer.
What is the difference between mule deer and whitetail hunting?
The biggest difference is method. Whitetail hunting is primarily an ambush game — you scout, find patterns, set up in a stand or blind, and wait for the deer to come to you. Mule deer hunting is an active pursuit. You cover ground, glass country, locate a specific deer, and go to him. Mule deer live in more open terrain, which makes them visible at greater distances but also makes approaching them without detection much harder. Shot distances tend to be significantly longer, optics are more critical, and physical fitness plays a larger role. If you are transitioning from whitetails, our whitetail hunting beginners guide provides the foundation, and this guide builds on those concepts for the western environment.